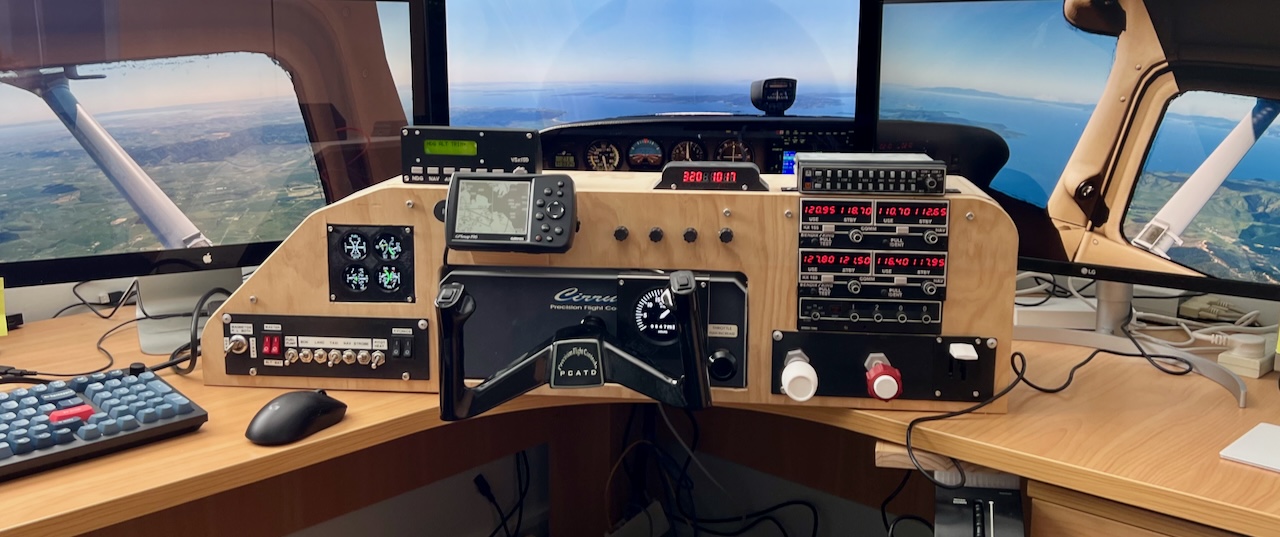
Cessna 172 Audio Panel
Now I had Flight Radios and a Transponder in my radio stack, it was only natural that I add a real Audio Panel! My goal is to not need to touch the mouse or keyboard for any flight related function. Like the Transponder project, I bought an old KMA-24 on-line. I tried to get the cleanest looking one I could find.
The next sections provide a little more information on my process to complete this conversion project.
Examine the Unit
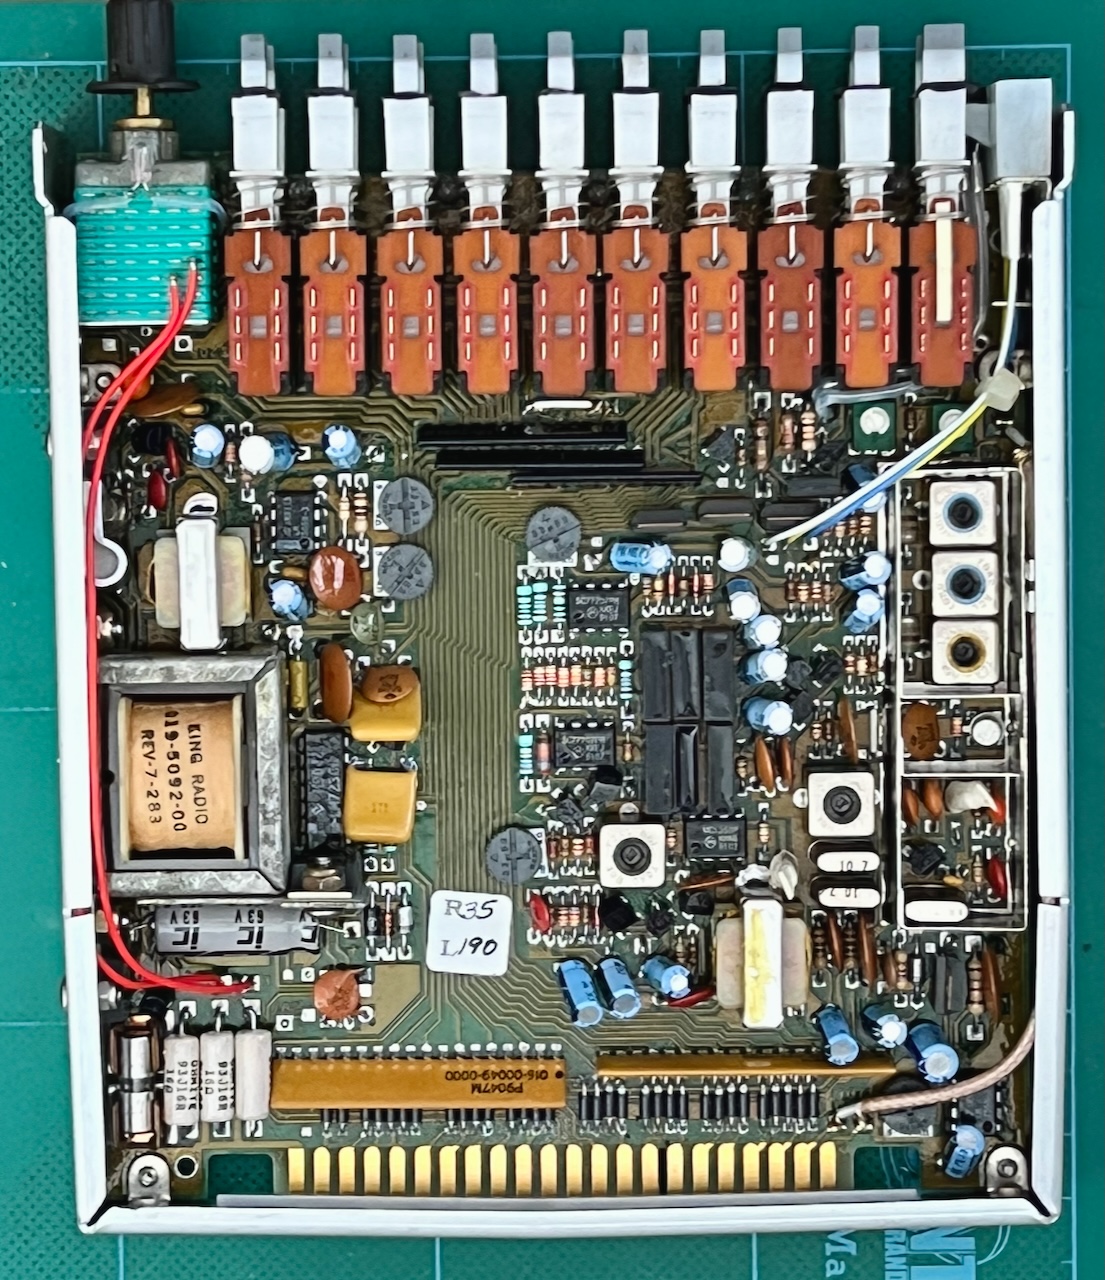
For this conversion I chose a different approach to the transponder main board replacement. Given the complexity of the button components on this audio panel, I felt I needed to retain the original PCB. This would save a lot of time creating a custom PCB but also remove the posibility of damaging the switches during removal. The button switches are not simple toggle buttons. They have six pins each and the rotary selector has over 24 pins!
The inside may look quite intimidating at first so to help with that I found a pdf of the KMA-24 service manual that included the schematic. This proved invaluable in understanding where I might attach I/O lines for the microcontroller.
The first image to the right shows the origianl, unmodified PCB.
Conversion Connection Points
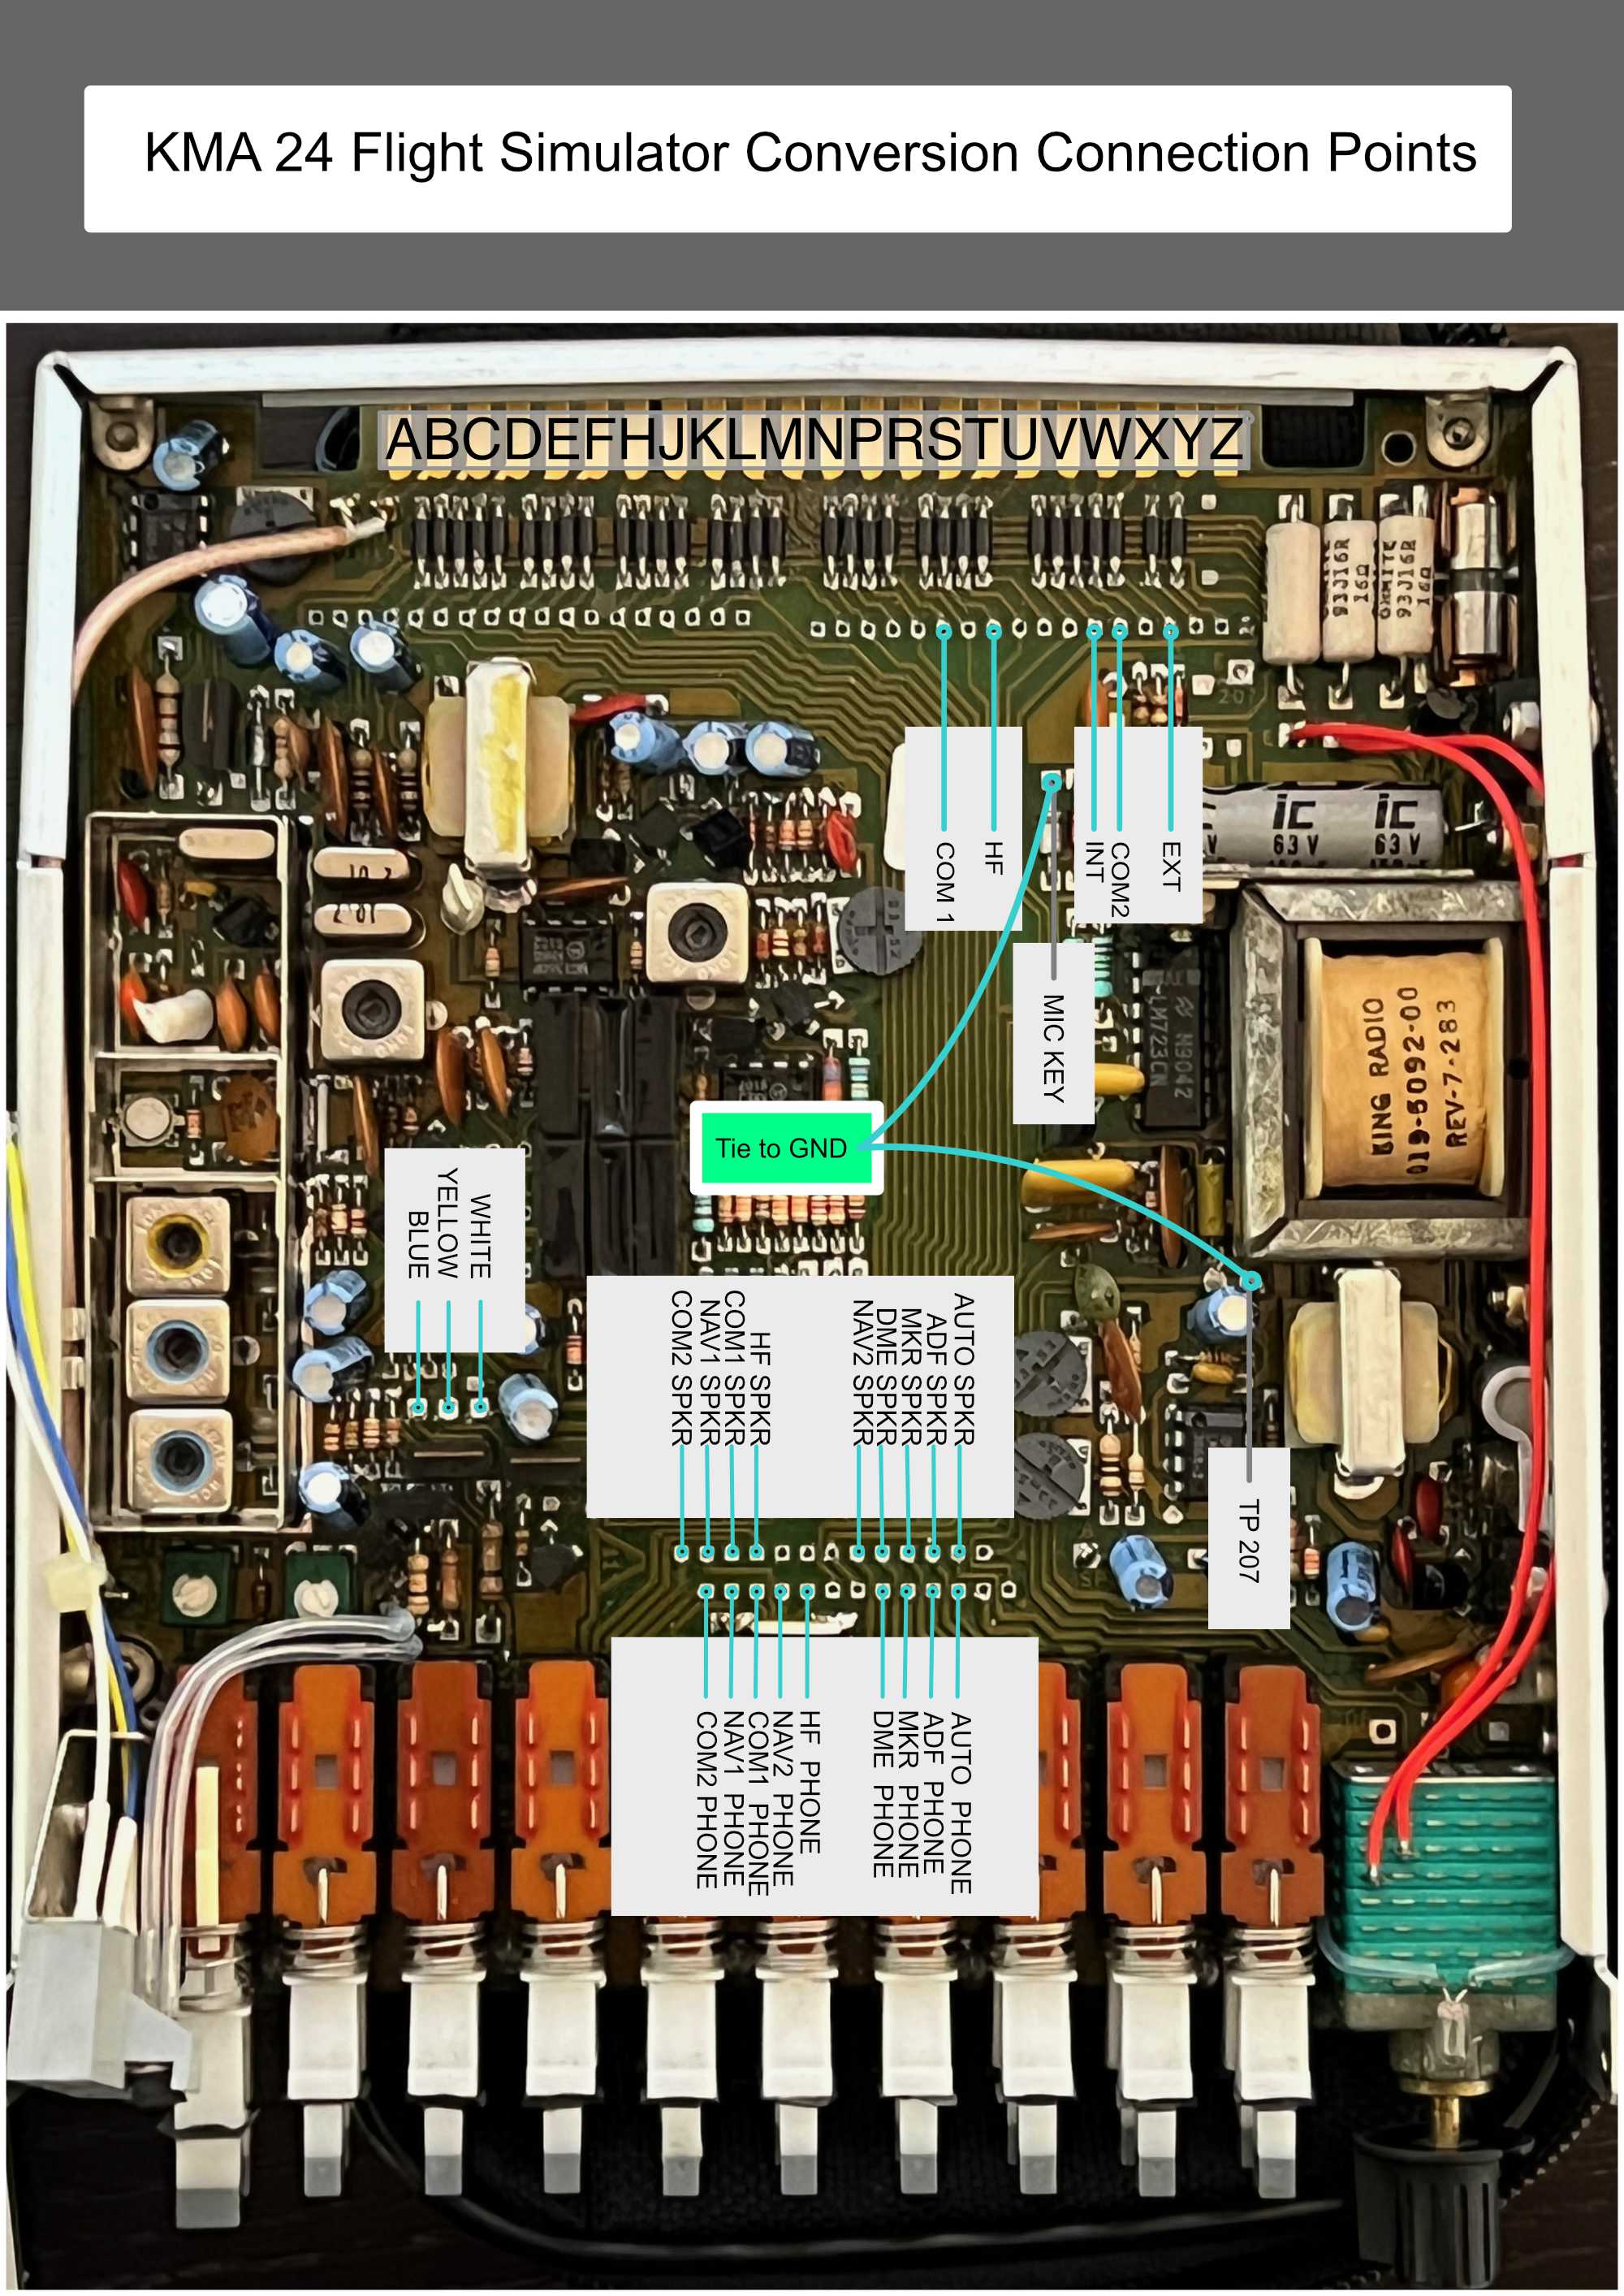
I worked through the schematic diagram until I had all the functionality I needed identified. I managed to figure out which components to remove to ensure electrical isolation and which traces to use for each front panel function.
The image to the right shows a top down view of the PCB with selected components removed and overlay labels showing the trace to connect to microcontroler I/O pins.
USB Adapter PCB
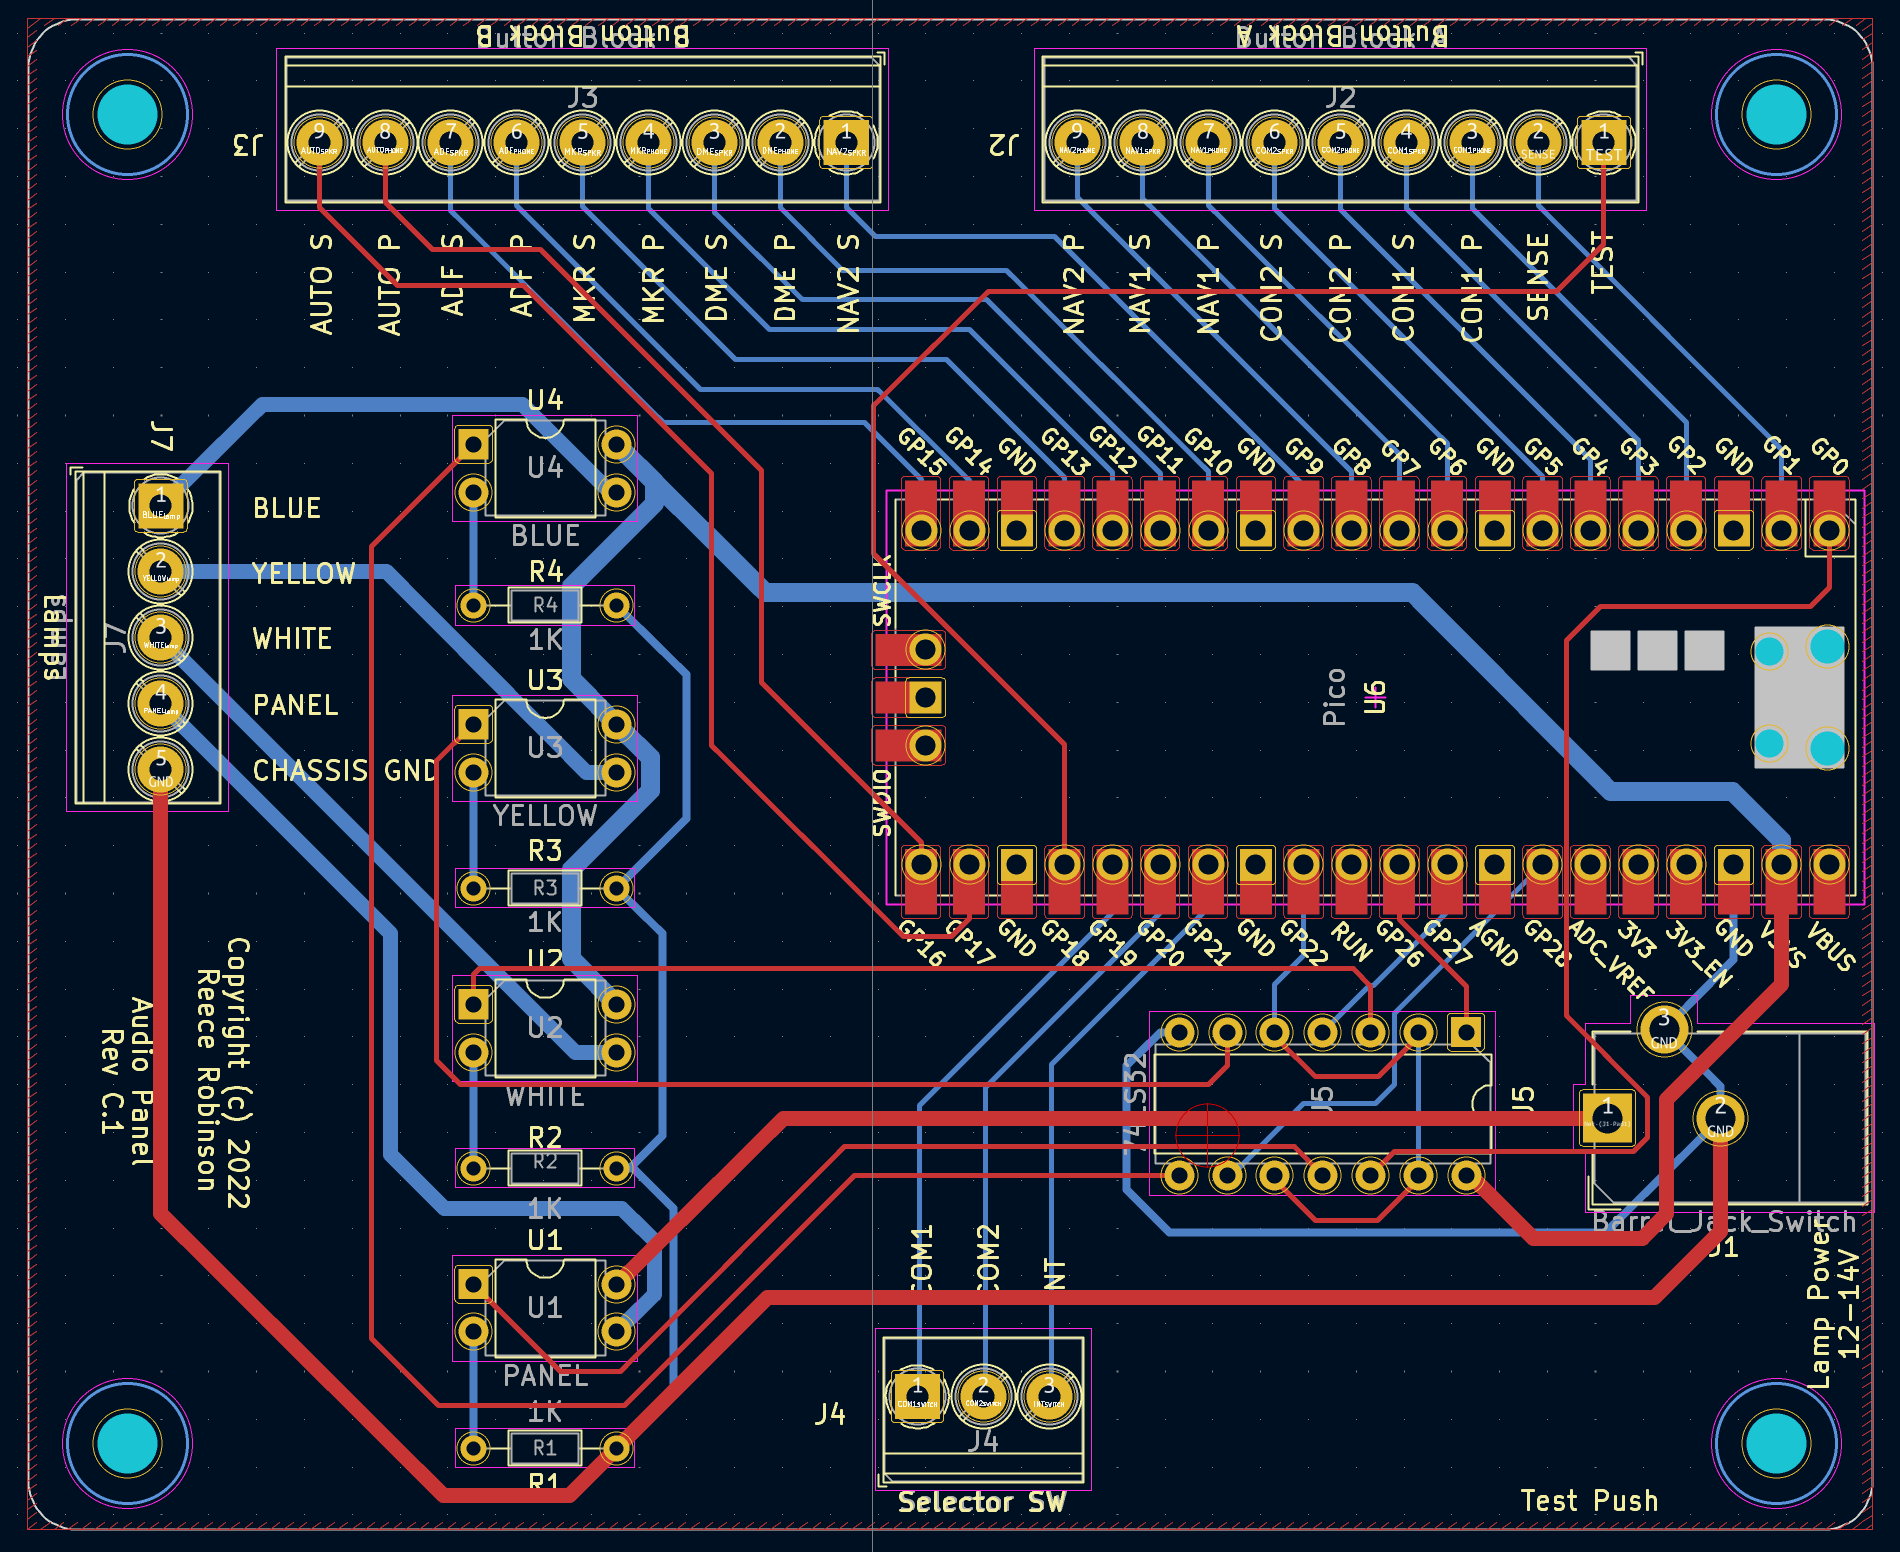
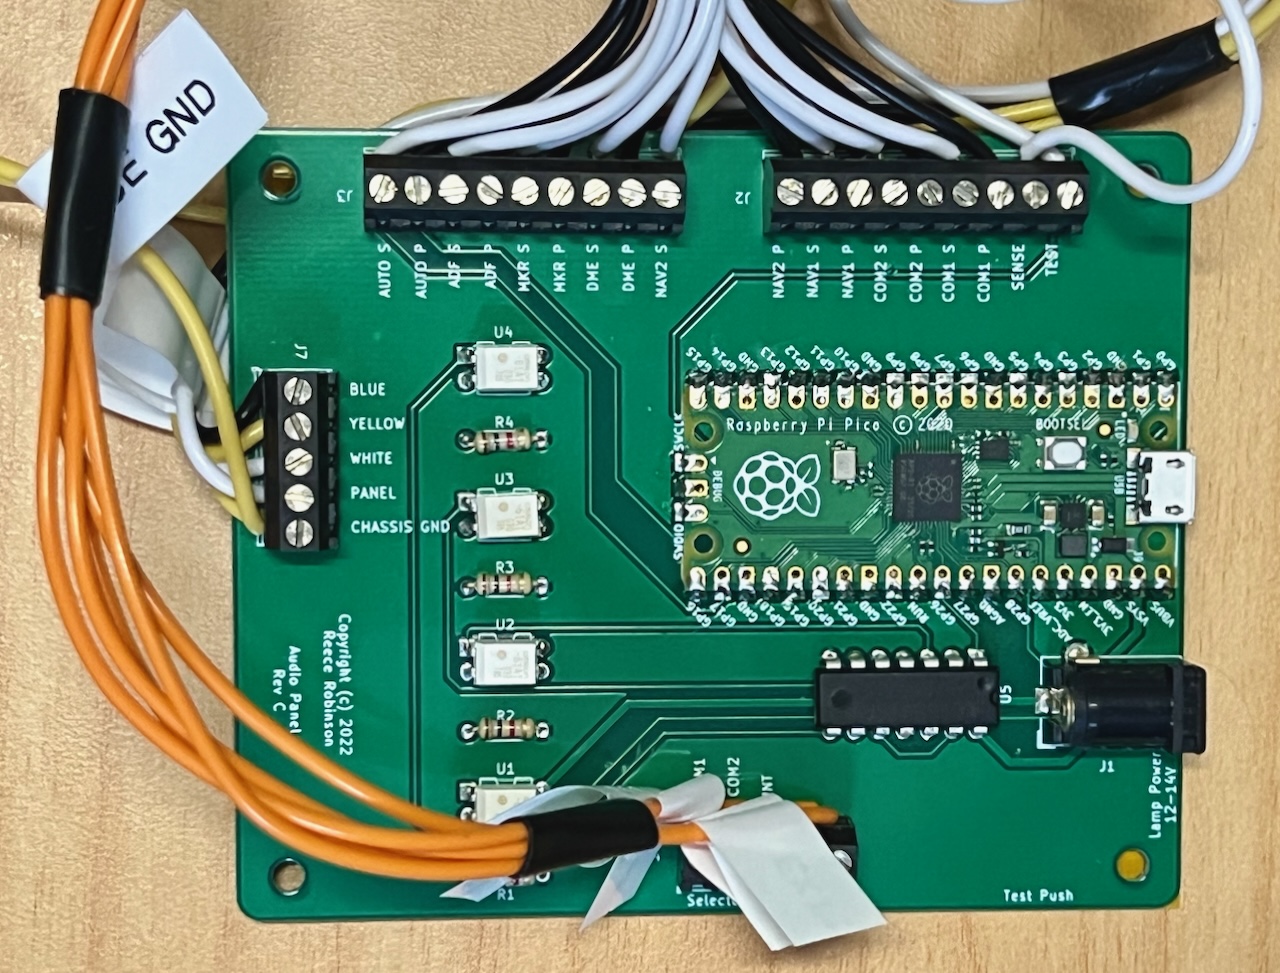
The USB Adapter PCB was not going to fit inside the existing case so I designed it to be remote to the audio panel with hookup wires extended from the Audio Panel PCB to the adapter board. These wires need to be organised to minimise wire chaos.
The Pico has a lot of useful I/O but not quite enough for all the functions provided on the audio panel. To determine which functions to leave off, I looked at what functions were provided in the simulator for the Cessna 172 audio panel. It was clear that leaving off the High Frequency (HF) function was okay.
As with the transponder, I kept the original lamps instead of converting to LED. My preference is to maintain the original visual characteristics.
With this USB Adapter PCB I included control of the marker beacon indicators for inner, middle and outer positions as well as the panel back lighting lamps.
To provide the 12-14VDC to power the lamps there is a barrel jack connector where you can connect a DC voltage source.
The completed board is shown on the right.
Parts
The following are the parts needed to populate the PCB.
| Qty | Reference(s) | Value | LibPart | Datasheet |
|---|---|---|---|---|
| 1 | J1 | Barrel_Jack_Switch | Connector:Barrel_Jack_Switch | ~ |
| 2 | J2, J3 | Button Block A, B | Connector:Screw_Terminal_01x09 | ~ |
| 1 | J4 | Selector SW | Connector:Screw_Terminal_01x03 | ~ |
| 1 | J7 | Lamps | Connector:Screw_Terminal_01x05 | ~ |
| 4 | R1, R2, R3, R4 | 1K | Device:R | ~ |
| 4 | U1, U2, U3, U4 | PANEL LAMP Switch | Relay_SolidState:TLP222A | https://toshiba.semicon-storage.com/info/docget.jsp?did=17036&prodName=TLP222A |
| 1 | U5 | 74LS32 | 74xx:74LS32 | http://www.ti.com/lit/gpn/sn74LS32 |
| 1 | U6 | Pico | MCU_RaspberryPi_and_Boards:Pico |
Audio Panel Software
The software required to realise this project includes:
-
the firmware to read the selected audio output enable buttons, mode selector and test button as well as control the panel lamps.
-
an X-Plane plug-in to communicate with the transponder (custom HID device) and interface with the flight simulator.
The next sections provide more detail.
Firmware
The firmware requirements were met by using circuitpython... well almost. I did however need to submit a patch to that project to support custom HID devices. But once that was accepted, circuitpython had all the functionality needed.
The firmware presents the audio panel as a custom USB HID device to the flight simulation host computer. The X-Plane plugin facilitates communication to integrate the audio panel with the simulator.
X-Plane Plugin
The other part of the software is the X-Plane plugin that works with the audio panel HID device. This plugin is largely based on the project created by PaulStoffregen & Jorg Neves Bliesener and is used to communicate between the transponder firmware and the flight simulator. Input values are sent to the simulator and lamp illumination state received and used to control the marker beacon indicator lamps and the panel back light.
I am a Mac user (that is a big reason I use X-Plane 😉) so I have compiled and tested the plugin on my machine. There was a bug in the original project that I fixed in my fork of the codebase. Using Ubuntu Linux, I compiled the linux and windows versons which are included in the download. The windows version has been tested on Windows 10 Home. The linux version is not tested as I don’t have the hardware for it. If you run X-Plane on Linux I would love to hear from you if you get that version working or not?
To install the plugin unzip the attached plugin archive file in the X-Plane plugins directory. The “FlightControls” folder should end up in the X-Plane plugins directory.
If there is enough interest I will provide the source code of the plugin so anyone can help with the builds for the various platforms.
Note: If the macOS Gatekeeper is blocking the plugin, you can bypass Gatekeeper for this specific instance.
1. Open Terminal:
You can find Terminal in Applications > Utilities.
cd /path/to/X-Plane/Resources/plugins/FlightControls
2. Navigate to the Plugin Directory:
Use the cd command to navigate to the directory containing the mac.xpl plugin. For example:
xattr -d com.apple.quarantine mac.xpl
Connections
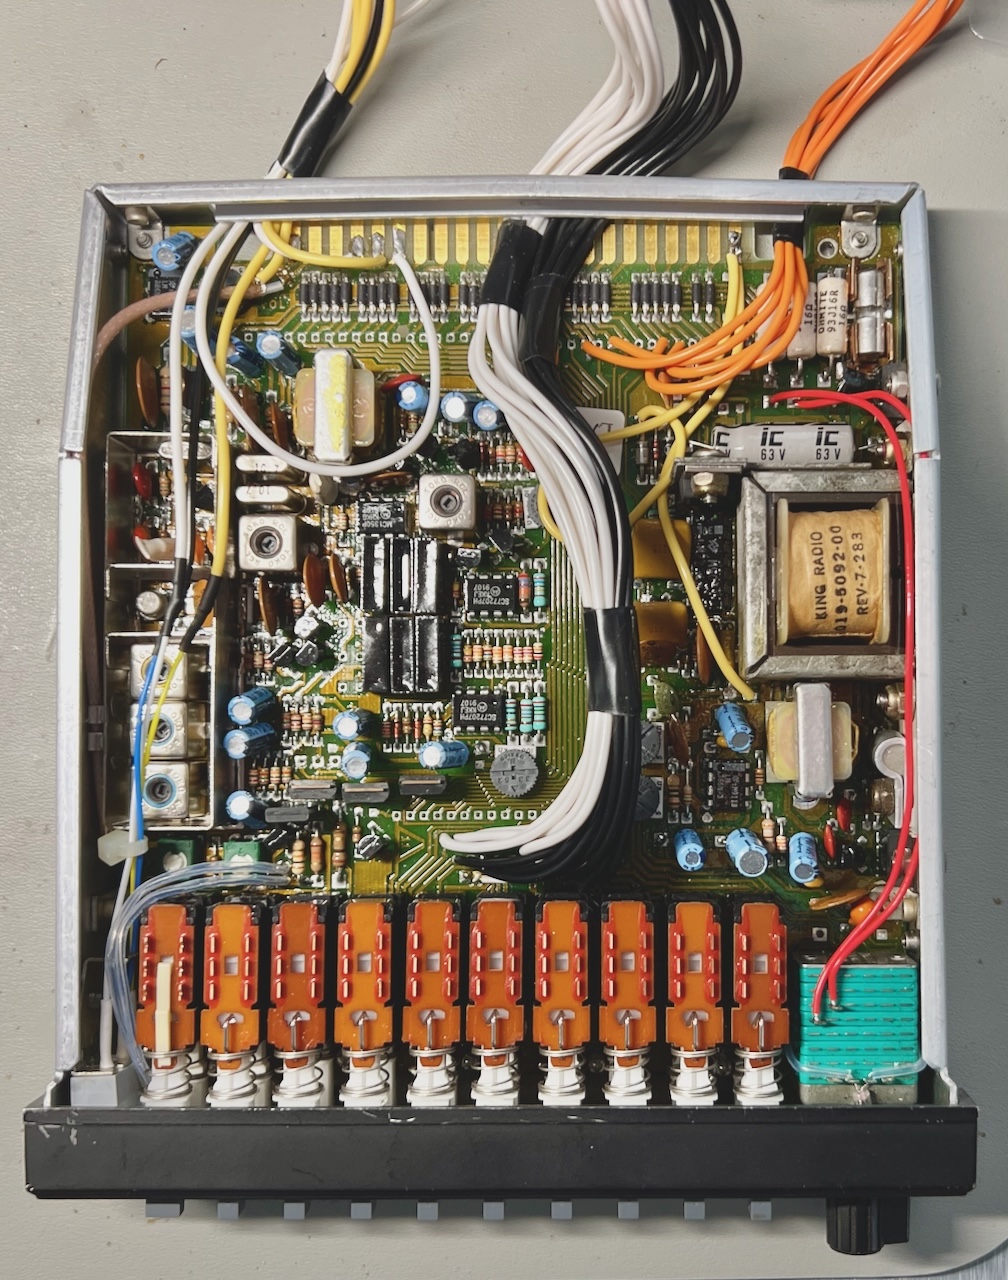
The image to the right shows the completed hook up for the I/O. In addition to the functional I/O wires, you also need to connect a common ground from the main PCB to the adapter PCB.
Marker Beacon Position Calculator
My home airport marker beacons are not provided in the default X-Plane content. Perhaps these systems are being phased out due to GPS and modern instrument adoption. In any case I wanted to add the marker beacons for a number of airport runways in my country.
I want to enjoy the marker beacon indicator lamps lighting up when I fly over the marker.
X-Plane has a NAV text “database” of airfield navigation services that has a simple record definition. I decided to create a script that given a runway’s true magnetic headings (both directions) and, the LAT/LON of the thresholds, it would calculate the inner, middle and outer marker LAT, LON coordinates in a format I could append to the X-Plane configuration.
The default earth_nav.dat file in the '/[path]/X-Plane 12/Resources/default data' folder starts with this:
I
1200 Version - data cycle 2112, build 20211207, metadata NavXP1200. Copyright (c) 2021 Navigraph, Datasource Jeppesen
3 9.037805556 7.285111111 1191 11630 130 -0.000 ABC ENRT DN ABUJA VOR/DME
12 9.037805556 7.285111111 1191 11630 130 0.000 ABC ENRT DN ABUJA VOR/DME
3 11.549222222 43.154861111 40 11460 130 2.000 ABI ENRT HD DJIBOUTI TACAN
12 11.549222222 43.154861111 40 11460 130 0.000 ABI ENRT HD DJIBOUTI TACAN DME
I insert the notebook output csv lines after the header and before the first data row.

Operation
Now that I am using this Audio Panel in my simulator panel I am glad that I have it. It makes the use of the two radios more realistic. For example, While listening on COM1, I tune the ATIS for my destination in COM2 as active but turn off COM2 in the audio panel. That allows me to just press COM2 on the audio panel to start listening to the weather. When I am done with the weather I can disable COM2 again on the panel. If I need a reminder of the weather I can again press COM2 to hear the information.
The marker beacon feature is also nice to have. When approaching unfamiliar airports with marker beacons it is good confirmation to see the flashing lamp on my panel.
